Sunday, February 27, 2011

This Pattern Deserves Better.

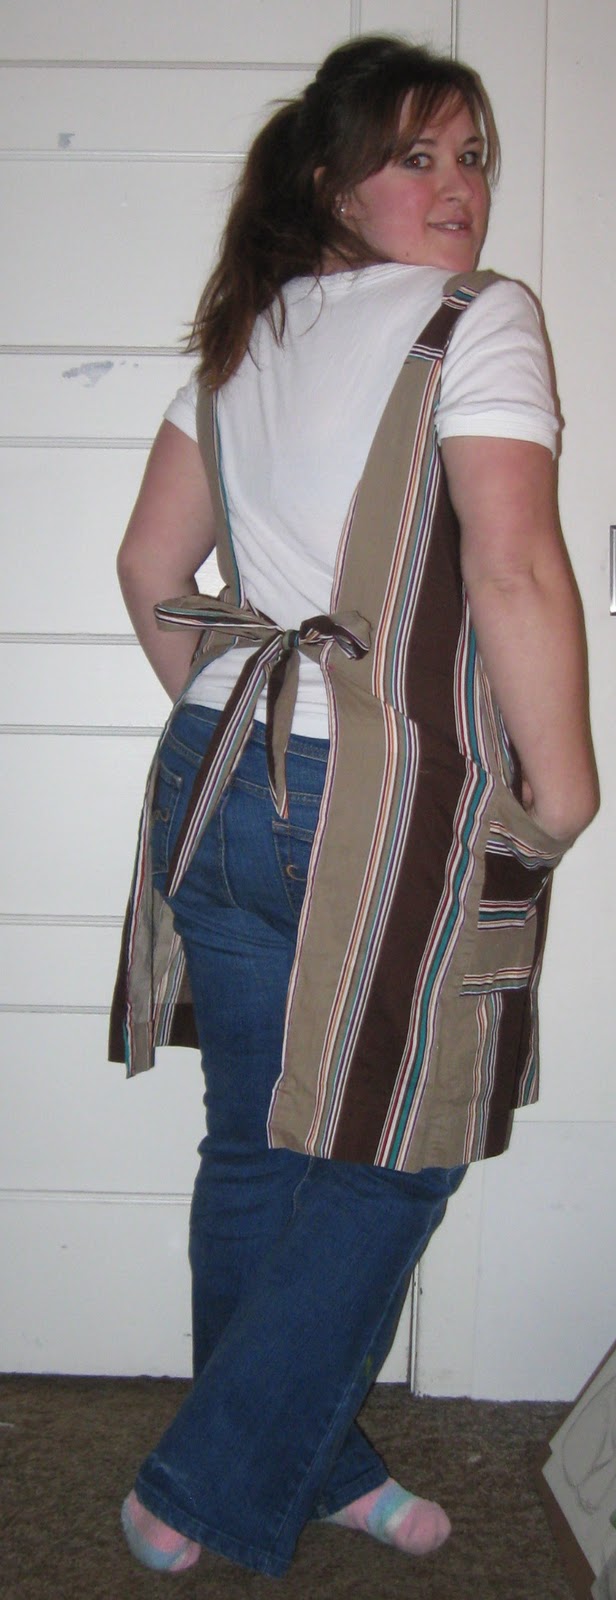
I made something out of something. Like I do.

I wasn't happy with it. Which sometimes happens. 

So I gave it away. Because it's still cute. 

But I have big plans for this pattern. So you're gonna see it again. 

But first: The before. Just a regular, plain t-shirt that I've had for ages.

I cut up the middle, and then I cut off the neck.


Then I turned it inside out and pinned the new hem about an inch wide.
Remember when pinning that the back needs to be turned to the inside of the shirt,
which is now the outside. 

So after I stitched the new hem, I inch-wormed a thin, organdy ribbon through the new "tube hem" (I just made that term up) with a safety pin. I thought I took a photo at this point, but I guess not. 
I didn't like it simply because it didn't fit me. The T-shirt is too small and my... well... you know. It wasn't flattering, to say the least.

So here's the completed project, modeled by (and given to) my lovely roommate turned assistant, Fancy.
She looks so happy when I give her presents.


What I'm envisioning for this pattern is a cable knit sweater, super soft, with a coordinating silk ribbon. So that's gonna happen... as soon as I thrift the right sweater!

This project: $0. 


Monday, February 21, 2011

I Have an Ugly Apron.

Yes, I wear an apron.
Why an apron? Well, for a couple of reasons. First, I fry things in olive oil a lot, and it spatters, and I'm sick of tiny oil splotches on my clothes. Second, when I make bread or pizza dough, I wipe my flour-y hands all over my jeans. Gross. Third, I have a painting class and to prevent ALL my clothes from being permanently oil-paint-stained, an apron is a must. Fourth, I'm pretty sure I was a 50's housewife in a past life. But the problem...
This apron is ugly.
Can't you see how unhappy I am?
So, the last time I was at Goodwill, I bought this to turn into an apron.


I also love these socks.
Things I love about the smock: 
These Buttons ♥
-The Girl Scout-esque color palette
-The large pockets
-The buttons

Things I hate about the smock:
-It's a tent
-The extremely high front
-The back is exactly the same as the front, minus the pockets.
-It's not an apron.


This is how I fixed it:

First, I cut straight up the back. I wished I had my seam rippers, but they are currently in hiding. 
There are those socks again!
I also removed some fabric to battle the tentness. 14 inches of it, actually...


I put these aside, as they will come in handy later.


This is after both of the sides have been hemmed. I chose a fushia-colored thread because I liked the way it looked, and I didn't have a brown that matched.


Remember that extra fabric I cut out? Well, here it is again!
I folded the extra strips in half inside out and pinned and stitched it to make the ties... a very important part of any apron! The top one is completed, the bottom one is just pinned.


I attached the new ties to the back of the apron with a couple of cute x's.
just because.
So that leaves just the one problem left: The awkwardly high neck. It was an easy fix: I made a cut straight down the middle and folded the extra fabric back:
Then I hemmed it and trimmed off the access fabric underneath.
Annnnnnnnndddddd
Here's my new Apron!!


This project: $3.50


Why I've Been Ignoring You (aka "A Good Way to Show Off)


Hello.
Remember Me? I'm that girl you know that has that decent blog that is sometimes funny. Right, this one. This terribly out of date one.

Well, I have a good reason. It's called an Art Minor. And it takes up so. much. time. So I'm going to show you some of the things that have been occupying my time in hopes that you will no longer be sad that I've been gone. 

Here are two of the projects from my Sculpture class. I don't have the third back yet, but I'll be getting it soon and will share it, too!
This gun is made out of quarter inch steel bar, handshaped and welded.
I covered the frame with AriZona Green Tea cans, and added some decoration.
It measures about 27"x16"x4". It's meant to hang on the wall, "discharging" the bird bullets, pictured below.
These measure about 2.5" in diameter.
This next one is a cupboard inspired by Lewis Carroll & Sir John Tenniel's Alice in Wonderland (Probably my biggest obsession)

It's supposed to be the White Rabbit's Vest :)


This piece measures about 15"x13"x7"


Last semester I also had a drawing class... Here are a few of the bigger projects.

This project is based on a Bob Dylan song, "A Hard Rain's A-Gonna Fall"
The Lyrics I picked out of a hat were, "I met a young child beside a dead pony"

Morphing Project

Still Life

This semester, I have another two art classes, oil painting & 3-D design. I'll keep putting pictures up as I get things back :)


Wednesday, November 24, 2010

This Isn't Your Grandmother's Jello...

First of all, you guys are going to have to help me come up with a better name for these. 
because
Drunken Coffee Gelatin Jigglers
 just doesn't do it.


Secondly, if & when you do make them, promise me you'll taste two. Because, I'm going to be honest, the first one's a little weird. No one is used to coffee in a solid(ish) state. Once you get past the consistency though... you might find yourself in trouble. Don't forget. This has both caffeine and alcohol in it... so go easy. 

And, of course, keep them out of the reach of children. 

The Recipe (not in a fancy pictoral recipe, sorry!)
3 packets Knox unflavored Gelatin
1/2 cp cold water
1 3/4 cp strongly brewed coffee, hot
1 14oz can sweetened condensed milk (NOT the evaporated milk)
3 tbsps. Alcohol of your choice
                     (the original recipe calls for Kahlua-- I opted for the $6 bottle of Amaretto over
                       the $18 bottle of Kahlua, but I think the Kahlua would be even better)

1. Make Gelatin. (Add cold water to powder, whisk to blend.) Let sit for 10 minutes. It needs to "bloom."
2. Meanwhile, make coffee. I used 8 tbsp coffee and 2 cps water and was a little short, so I guess it depends on your coffee maker. 
Properly 'bloomed' gelatin

3. After the ten minutes are up, add the coffee to the Gelatin, and whisk to mix but GENTLY. The goal is to not create bubbles or froth.
4. Add the can of sweetened condensed milk, whisking gently to mix. Again, no bubbles.
5. Add the alcohol. I was tempted to go with more than 3 tbsps, later I was glad that I didn't... probably don't on the first try... but I'll leave it to your discretion. Mix gently.
6. Pour into an 8x8 glass casserole dish (or plastic containers, or a cake pan... whatever)
      (if you end up with bubbles, you can try to pop them now, or just skim 
                      them from the surface with a spoon. The bubbles set into the gelatin, and look funny later)


7.Cover and fridge until set.
8. Cut up & serve! You can put them just on a platter, as I did, stick them into Cupcake Foils, whatever you please :)
delicious.


So, I hope that you all enjoy your Thanksgiving and, if you are brave enough to try these... enjoy them ;)

Saturday, November 20, 2010

Because Some Days I Crave Organization... and Chocolate.

The same Origami Calendar that once inspired Halloweenigami has inspired a massive clean-up of the messiest place in my bedroom. Worse than under the bed. Worse than the closet floor.

my desk drawer.

Now, when I began this project, I was too embarrassed to take a "before" image... so just imagine... a plethora of pencils, pens, & markers. More office supplies than I can shake a stick at. Papers, papers, papers. Some were important (bills, addresses, a birthday card from Grandma O) some were not (work schedule from Spring '09, grocery receipts, etc.)
In fact, one day, my roommate, I call her Fancy, came into my room before I was awake.
"I need a stapler!" she cries. "I'm already late for class!" 
"it's either on the desk or in the desk" I mumble from under my covers, no intention of getting up to help.

Rummage, rummage, rummage....

....rummage, rummage, rummage...

She gave up. "Is this thingy a paper clip?"
"Is it a spiral?" (because of course I can't even have 'normal' paperclips)
"yes."
"yes."
So that gives you a good idea on just how crazy messy it was... 
but thanks to this:


I ended up with:

The Stapler is now front & center!
I used Scrapbooking paper for my origami... it's thick enough to hold up to more wear & tear, plus, it's sooo pretty. Here are close ups of one box and a lazy susan:


After sorting & tossing the useless papers that were in my drawer, I recycled a couple of drawings I did for an art class some semesters ago but never wanted to throw away. I folded them into folders and tied them with a bit of embroidery floss.


I like to call it "Origaminization"


So now that I've shared my Organization craze.... here's the chocolate part... in the delicious form of 

CHOCOLATE MUG CAKE 

here is my pictoral recipe: 


It's pretty self-explanatory, so I'm going to skip all of the photos of the doing... except for this one:

It just makes me giggle.

When it's all mixed and cooked... 


Slide it out onto a plate (serves two... or one selfish one!)
Add ice cream or a tall glass of cold milk...

It's dangerous when you realize you're only about 6 minutes away from a good piece of chocolate cake.

And for next time... the one thing that will help get you through your family Thanksgiving...

...hint... it's an appetizer that has coffee and booze


Thursday, November 4, 2010

Mad for Plaid

One thing that seems to be back in style this season is plaid. It's everywhere! I even saw a website that said "This season's two greatest hits, Tweed & Plaid!" I thought, If only I could find something that was plaid tweed, it'd be two birds, one stone.  Ultra-trendy. if you will.


Instead, Goodwill sold me this lovely plaid poly-cotton blend, but the colors are fantastic, and it's got darling mother-of-pearl snaps. And it's only about 6 sizes too big.
 I can't give a proper thumbs-up as the length of the sleeves inhibits the movement.
Anyone up for a picnic? 

First of all, I had to get rid of a lot of extra material, lest I have bustle like an early 1900's dress.  Then, I used a strip of elastic to keep the new ruffle in place as well as provide some room for movement. We all know there's nothing worse than a button-up that is too tight and has no movement... it's a popped button, waiting to happen. Especially if your cup runneth over as mine does. 

Helpful hint? I pinned the stretched elastic to a block of wood to make it easier to sew.
Then I stitched up where I had removed the fabric, and was met with a very unsightly bulge-y mess. So, I took that extra material and fashioned a bow... awwww.

It's practically camouflaged, but adorable nonetheless!

THEN... disaster strikes.

I sewed the bottom of the shirt to the back of the bow! It's the equivalent of tucking your skirt into your pantyhose!


Ugh. Rookie Mistake
So after I redid the bow, the shirt looked good, but still kinda mannish. It needed a feminine touch. So I grabbed the lace. ♥


And VoĆ­la... 
my new shirt is born.


The shirt cost $2.96 at Goodwill. 
It took less than 4 hours.


This Project: $2.96
Total Project: $9.67
.

Sunday, October 31, 2010

Halloweenigami

At work on Friday, I was very bored. There wasn't any work to do and the 5 hour shift lasted longer than my entire week. So what did I do?

Origami. Duh.

Since today's Halloween, I am (procrastinating real homework) and going to post the cute 'gamis that I did.
Also, if you're bored and have a square of paper, I highly encourage origami. Mostly because it's frickin' sweet, but it's also... because it's origami. What else do you need?

What was the Hippie Vampire like?
He was ghoul, man. Real ghoul.

What do you call a mummy that eats cookies in his tomb?
A crummy mummy!

What do little ghosts drink?
Evaporated Milk!

The vampire came from the 365 Days of Origami calendar at work (really cool... er, ghoul) and here are the links to the others... 
the ghost came from this great website

and the mummy from this one:

the mummy is super-easy and would be great for kids! 

I wish everyone an awesome Halloween!