That, my friends, is the [approximate] square footage of my new apartment.
One Hundred.
Seventy.
Seven.
Now, I can't tell you the exact location of my new place, since you know, this blog is public & I'm not interested in inviting strangers/creepers/weirdies/crazies to check it out in person, but I'll tell you that it's in the downtown area. It's a lovely place.
I have been living there since Tuesday, but actually haven't spent much time there at all, between work and cleaning the old house, and so things may change as I figure out more what does and doesn't work, and when I get things or get rid of things, etc. etc. etc. But, I promised my mom she could see better pictures than my phone can send, so this is it.
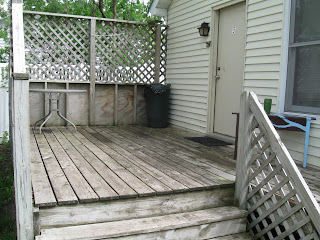
First, I'll start with the porch.
it's huge. I haven't measured it, but it's probably about the size of the apartment.
It doesn't really have a plan, yet, since it's quite light on furniture, but it will shape up :)
I painted that little corner table, by the way!
So, now that you've seen the outside, here is the inside view of the front door. I haven't had time to hang pictures, so just imagine it like it's been hung.
 |
And, in the spirit of bargain-hunting, the bed came from a garage sale at my brother's neighbors in Romeo. It's an antique frame. The bedside table came from a garage sale, and I painted it. The lamp, from Goodwill, the picture is a copy of a print Grandma O & I found at a garage sale. She has the original. The rugs... I think Goodwill, too, my mom's a Goodwill Girl!
This is the South Wall... The Dresser came from a garage sale, I painted it. The bookcase was left behind from a roommate last year, and the shoe hanger thingy was a Goodwill thing, too.
The closet is actually pretty big, it's about 5'x3', and I don't have any pictures of it yet, but I'll update later with some. I hung the Safarigami painting I did! That chair is the one I covered in the last post, the TV cupboard is a shabby chic thing that came from, you guessed it, Goodwill!
The last little bit:
The "Office" area.
The table was from a garage sale, the chairs from a used furniture store. The lamp and picture... goodwill!
Now... if that much stuff in that tiny space isn't enough to blow your mind, let me throw another number at you.
169.
That's how much we outfitted my apartment for.
Bed, nightstand, dresser, bookshelf, 3 chairs, TV cabinet, table, 3 lamps, 2 rugs, a bathroom cabinet, 2 pictures, and a freaking partridge in a pear tree.
Kidding on that last one.
I don't have any photos of the kitchen, bathroom, or closet yet, because those areas haven't been completely moved into yet. But when I do, you can bet you'll be seeing those photos, too!
(PS. My bathroom? I hate it. It's the only part I don't like. You'll see why.)
....suspense....


